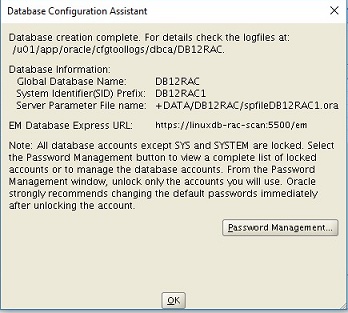
Prepare Servers for Grid and ASM Installation
Install Packages
Install the Oracle Linux packages needed by using the preinstallation RPM included with the Grid installation software : oracle-rdbms-server-12cR1-preinstall
# yum -y install oracle-rdbms-server-12cR1-preinstall -y
Loaded plugins: security
Setting up Install Process
Resolving Dependencies
--> Running transaction check
---> Package oracle-rdbms-server-12cR1-preinstall.x86_64 0:1.0-14.el6 will be installed
--> Processing Dependency: xorg-x11-utils for package: oracle-rdbms-server-12cR1-preinstall-1.0-14.el6.x86_64
--> Processing Dependency: gcc-c++ for package: oracle-rdbms-server-12cR1-preinstall-1.0-14.el6.x86_64
--> Processing Dependency: compat-libcap1 for package: oracle-rdbms-server-12cR1-preinstall-1.0-14.el6.x86_64
--> Processing Dependency: ksh for package: oracle-rdbms-server-12cR1-preinstall-1.0-14.el6.x86_64
--> Processing Dependency: libaio-devel for package: oracle-rdbms-server-12cR1-preinstall-1.0-14.el6.x86_64
--> Processing Dependency: xorg-x11-xauth for package: oracle-rdbms-server-12cR1-preinstall-1.0-14.el6.x86_64
--> Processing Dependency: compat-libstdc++-33 for package: oracle-rdbms-server-12cR1-preinstall-1.0-14.el6.x86_64
. . . . . .
Install and set NTP Clock synchronization
# yum install ntp -y
# vi /etc/sysconfig/ntpd
. . .
OPTIONS="-x -u ntp:ntp -p /var/run/ntpd.pid"
SYNC_HWCLOCK=no
NTPDATE_OPTIONS=""
Start or restart NTP service
# service ntpd start
Starting ntpd:
# service ntpd restart
Shutting down ntpd:                                               [ OK ]
Starting ntpd:                                                    [ OK ]
Do a full update to be sure
# yum update -y
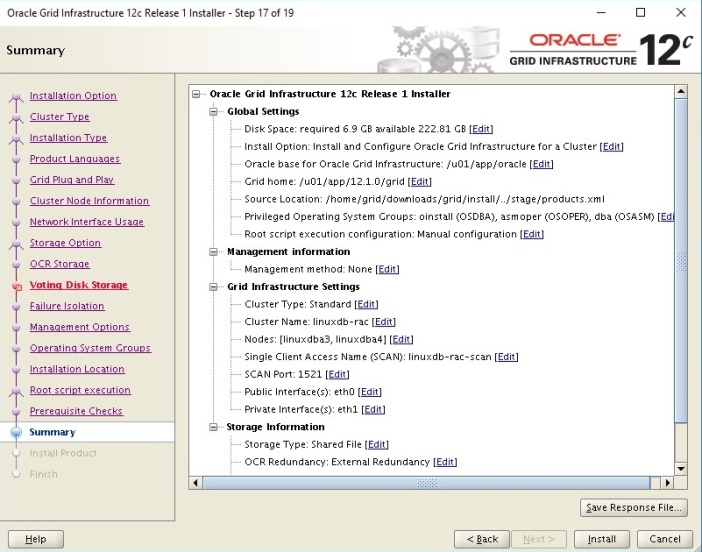
Network setup and configuration
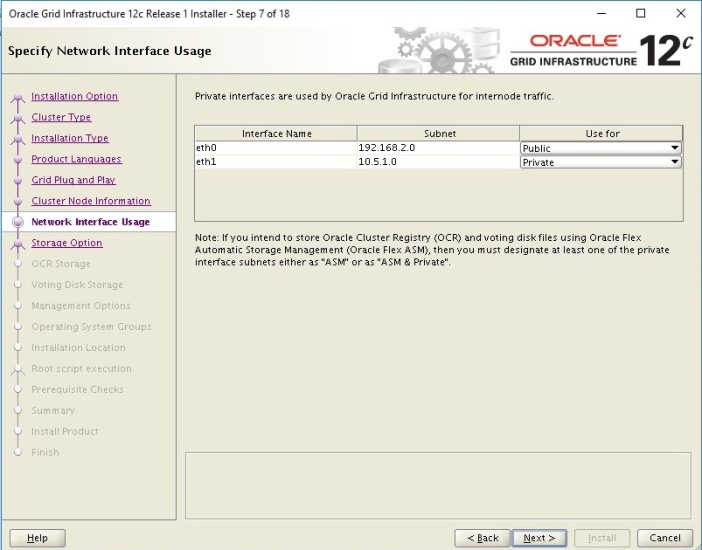
Each node will have two network interfaces. One for the public IP address and another for the private IP address. This install will use a static IP address configuration. Oracle also provides Grid Naming Service for dynamic IP address assignment.
Create the following:
1. A public IP address for each node
2. A private IP address on a separate subnet
3. A virtual IP address for each node in the same subnet as the public IP addresses
4. Three SCAN (single client access name) IP addresses in the public subnet
Note: Oracle recommends the use of network interfaces of at least 1Gbe, with 10Gbe recommended. Infiniband is an alternative recommended network interface.
If a NAS server, accessed by ethernet, is used, a third network interface for the NAS I/O is recommended.
Update /etc/hosts file with node names and IP addresses
# vi /etc/hosts
. . .
# Public IP addresses for the RAC nodes
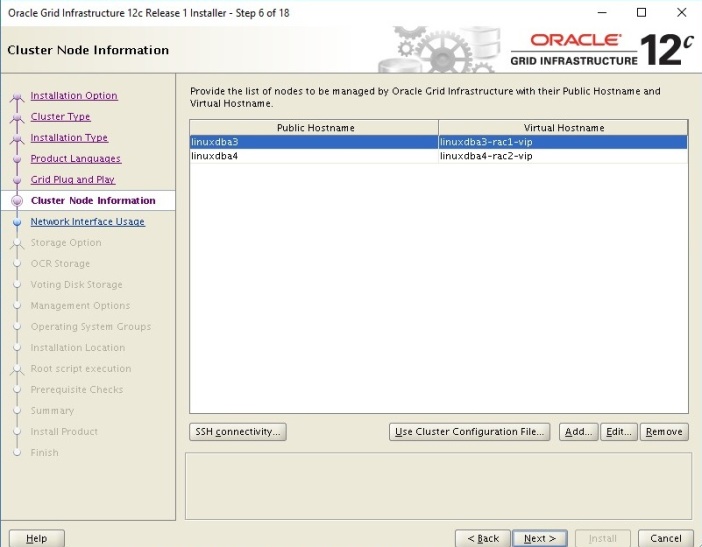
192.168.2.147 linuxdba3.localdomain linuxdba3
192.168.2.145 linuxdba4.localdomain linuxdba4
# Private IP addresses for the RAC nodes
10.5.1.20 linuxdba3-rac1-priv.localdomain linuxdba3-rac1-priv
10.5.1.30 linuxdba4-rac2-priv.localdomain linuxdba4-rac2-priv
# Virtual IP addresses for the RAC nodes
192.168.2.125 linuxdba3-rac1-vip.localdomain linuxdba3-rac1-vip
192.168.2.126 linuxdba4-rac2-vip.localdomain linuxdba4-rac2-vip
# SCAN IP addresses for the RAC nodes
192.168.2.135 linuxdb-rac-scan.localdomain linuxdb-rac-scan
192.168.2.136 linuxdb-rac-scan.localdomain linuxdb-rac-scan
192.168.2.137 linuxdb-rac-scan.localdomain linuxdb-rac-scan
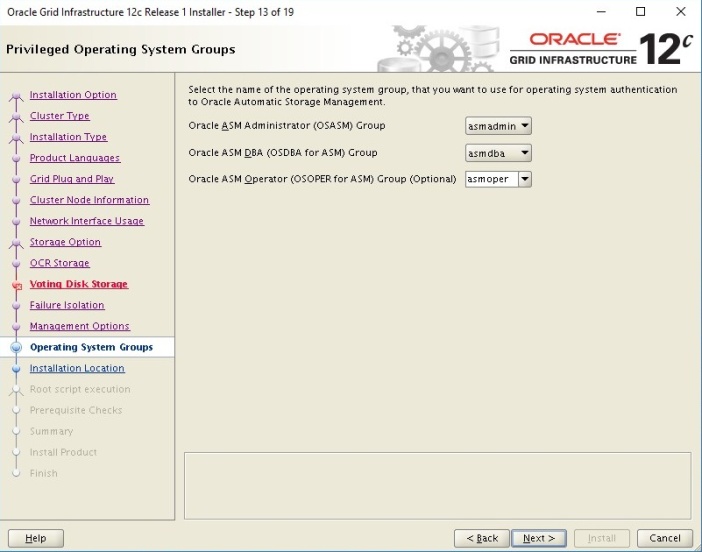
Create required users and groups
# groupadd oinstall
# groupadd asmadmin
# groupadd asmdba
# groupadd asmoper
# groupadd dba
# groupadd oper
# groupadd backupdba
# groupadd dgdba
# groupadd kmdba
# useradd grid -g oinstall -G asmadmin,asmdba,asmoper
# useradd oracle -g oinstall -G dba,oper,asmdba
# passwd grid
Changing password for user grid.
New password:
Retype new password:
passwd: all authentication tokens updated successfully.
# passwd oracle
Changing password for user oracle.
New password:
Retype new password:
passwd: all authentication tokens updated successfully
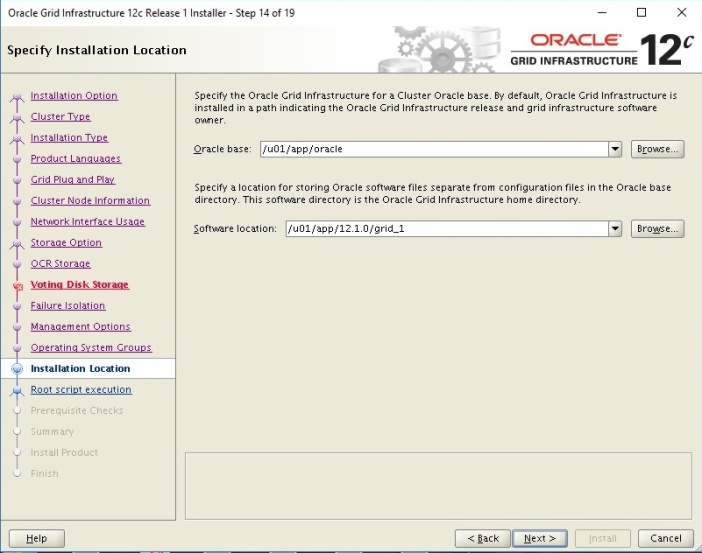
Create Grid and Database Home directories
# mkdir -p /u01/app/12.1.0/grid
# mkdir -p /u01/app/grid
# mkdir -p /u01/app/oracle
# chown -R grid:oinstall /u01
# chown oracle:oinstall /u01/app/oracle
# chmod -R 775 /u01/
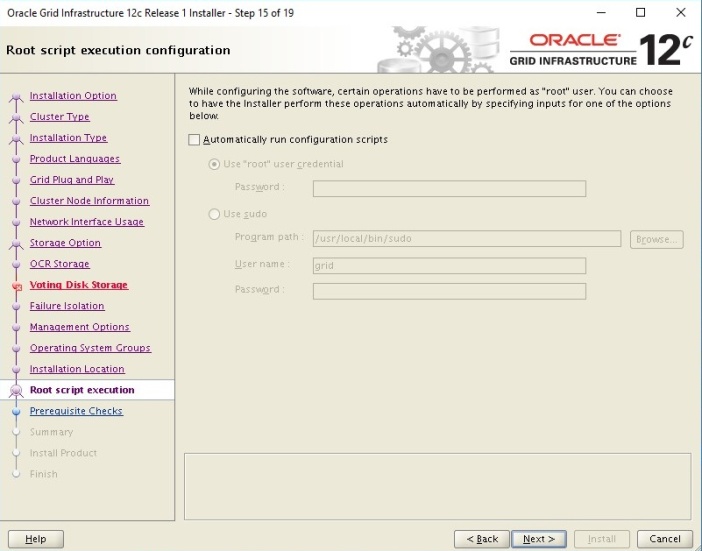
Install and configure ssh, scp
1. Login as the oracle user
2. Create the directory .ssh
$ mkdir ~/.ssh
$ chmod 755 ~/.ssh
3. Generate an RSA key. At the prompts accept the default location and ignore password request
$ /usr/bin/ssh-keygen -t rsa
A public key is written to ~/.ssh/id_rsa.pub and a private key is written to the file ~/.ssh/id_rsa.
4. Generate a DSA key.
$ /usr/bin/ssh-keygen -t dsa
A public key is written to ~/.ssh/id_dsa.pub and a private key is written to the file ~/.ssh/id_dsa.
5. Copy the contents of the ~/.ssh/id_rsa.pub and ~/.ssh/id_dsa.pub files to the ~/.ssh/authorized_keys file on this node and to the same file on all other cluster nodes.
Note: The ~/.ssh/authorized_keys file on every node must contain the contents from all of the ~/.ssh/id_rsa.pub and ~/.ssh/id_dsa.pub files that you generated on all cluster nodes.
6. Change the permissions on the ~/.ssh/authorized_keys file on all cluster nodes:
$ chmod 644 ~/.ssh/authorized_keys
7. If you have configured SSH correctly, you can now use the ssh or scp commands without being prompted for a password.
To test the SSH configuration, enter the following commands:
$ ssh nodename1 uname -n
$ ssh nodename2 uname –n
$ scp test1 node2:test1
You should see the name of the server displayed without a request for a password. If any node prompts for a password, verify that the ~/.ssh/authorized_keys file on that node contains the correct public keys.
Note: The first time you use SSH to connect to a node from a particular system, you might see a message stating that the authenticity of the host could not be established. Enter yes at the prompt to continue. The node is now added to the ~/.ssh/authorized_hosts file. Connect to each node using the node names and IP addresses so that this prompt will not occur during installation.
8. To ensure that X11 forwarding will not cause the installation to fail, create the ~oracle/.ssh/config file. Put the following text into the file:
Host *
ForwardX11 no
Set resource usage settings for user grid and oracle
The resource usage should have been set by the oracle-rdbms-server-12cR1-preinstall
package but check the files and update them manually if necessary.
# vi /etc/security/limits.conf
...
grid soft nofile 1024
grid hard nofile 65536
grid soft nproc 2047
grid hard nproc 16384
grid soft stack 10240
grid hard stack 32768

oracle soft nofile 1024
oracle hard nofile 65536
oracle soft nproc 2047
oracle hard nproc 16384
oracle soft stack 10240
oracle hard stack 32768
oracle soft memlock unlimited
oracle hard memlock unlimited
Verify that system kernel parameters are correctly set
# vi /etc/sysctl.conf
fs.file-max = 6815744
kernel.sem = 250 32000 100 128
kernel.shmmni = 4096
kernel.shmall = 1073741824
kernel.shmmax = 4398046511104
kernel.panic_on_oops = 1
net.core.rmem_default = 262144
net.core.rmem_max = 4194304
net.core.wmem_default = 262144
net.core.wmem_max = 1048576
net.ipv4.conf.all.rp_filter = 2
net.ipv4.conf.default.rp_filter = 2
fs.aio-max-nr = 1048576
net.ipv4.ip_local_port_range = 9000 65500
If file is manually updated then run the following command to update the kernel parameters
# /sbin/sysctl -p
Disable the Firewall
# chkconfig iptables off
# service iptables stop
Install ASMLib for managing ASM disks
Using yum install kmod-oracleasm package
# yum -y install kmod-oracleasm
. . .
Setting up Install Process
Resolving Dependencies
--> Running transaction check
---> Package kmod-oracleasm.x86_64 0:2.0.8-13.0.1.el6_8 will be installed
--> Processing Dependency: kernel(get_user_pages_fast) = 0xa2046a95 for package: kmod-oracleasm-2.0.8-13.0.1.el6_8.x86_64
--> Processing Dependency: kernel >= 2.6.32-642.el6 for package: kmod-oracleasm-2.0.8-13.0.1.el6_8.x86_64
--> Running transaction check
---> Package kernel.x86_64 0:2.6.32-642.15.1.el6 will be installed
--> Processing Dependency: dracut-kernel >= 004-408.el6 for package: kernel-2.6.32-642.15.1.el6.x86_64
--> Running transaction check
---> Package dracut-kernel.noarch 0:004-335.0.1.el6 will be updated
---> Package dracut-kernel.noarch 0:004-409.0.1.el6_8.2 will be an update
--> Processing Dependency: dracut = 004-409.0.1.el6_8.2 for package: dracut-kernel-004-409.0.1.el6_8.2.noarch
--> Running transaction check
---> Package dracut.noarch 0:004-335.0.1.el6 will be updated
---> Package dracut.noarch 0:004-409.0.1.el6_8.2 will be an update
--> Finished Dependency Resolution
...
...
Installed:
  kmod-oracleasm.x86_64 0:2.0.8-13.0.1.el6_8
Dependency Installed:
  kernel.x86_64 0:2.6.32-642.15.1.el6
Dependency Updated:
  dracut.noarch 0:004-409.0.1.el6_8.2 dracut-kernel.noarch 0:004-409.0.1.el6_8.2

Complete!
Install oracleasm-support package via yum.
# yum -y install oracleasm-support
Loaded plugins: refresh-packagekit, security
Repository google-chrome is listed more than once in the configuration
Setting up Install Process
Resolving Dependencies
--> Running transaction check
---> Package oracleasm-support.x86_64 0:2.1.8-1.el6 will be installed
--> Finished Dependency Resolution

Dependencies Resolved

=================================================================================================================
 Package Arch Version Repository Size
=================================================================================================================
Installing:
 oracleasm-support x86_64 2.1.8-1.el6 public_ol6_latest 73 k

Transaction Summary
=================================================================================================================
Install 1 Package(s)
Total download size: 73 k
Installed size: 216 k
Downloading Packages:
oracleasm-support-2.1.8-1.el6.x86_64.rpm | 73 kB 00:00
Running rpm_check_debug
Running Transaction Test
Transaction Test Succeeded
Running Transaction
  Installing : oracleasm-support-2.1.8-1.el6.x86_64 1/1
  Verifying : oracleasm-support-2.1.8-1.el6.x86_64 1/1

Installed:
  oracleasm-support.x86_64 0:2.1.8-1.el6

Complete!
Install oracleasmlib rpm directly from oracle.com.
# rpm -Uvh http://download.oracle.com/otn_software/asmlib/oracleasmlib-2.0.4-1.el6.x86_64.rpm
Retrieving http://download.oracle.com/otn_software/asmlib/oracleasmlib-2.0.4-1.el6.x86_64.rpm
Preparing... ########################################### [100%]
   1:oracleasmlib ########################################### [100%]
On both nodes, configure ASMLib.
# oracleasm configure -i
Configuring the Oracle ASM library driver.

This will configure the on-boot properties of the Oracle ASM library
driver. The following questions will determine whether the driver is
loaded on boot and what permissions it will have. The current values
will be shown in brackets ('[]'). Hitting  without typing an
answer will keep that current value. Ctrl-C will abort.

Default user to own the driver interface []: grid
Default group to own the driver interface []: asmadmin
Start Oracle ASM library driver on boot (y/n) [n]: y
Scan for Oracle ASM disks on boot (y/n) [y]: y
Writing Oracle ASM library driver configuration: done
# service oracleasm start
Initializing the Oracle ASMLib driver:                   [ OK ]
Scanning the system for Oracle ASMLib disks:             [ OK ]
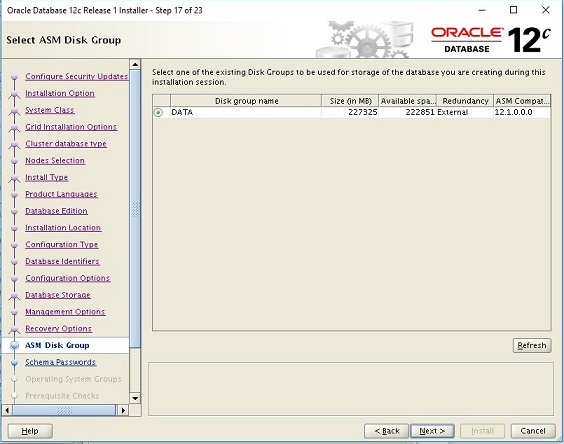
Create ASM disks
On node 1 create the candidate disk for the ASMLib
# oracleasm createdisk asm01 /dev/disk/by-path/ip-10.5.1.106:3260-iscsi-iqn.2005-10.org.nas.ctl:linuxdbiscsi-lun-0-part1
Writing disk header: done
Instantiating disk: done
# oracleasm listdisks
ASM01
On the other nodes just scan for the disks and then list them
# oracleasm scandisks
Reloading disk partitions: done
Cleaning any stale ASM disks...
Scanning system for ASM disks...
Instantiating disk "ASM01"
# oracleasm listdisks
ASM01